
Information Architecture: 4 Steps to Make Sense of Your Product Discovery Mess
Your product discovery process is a mess, and your information architecture (IA) is to blame. There, I said it. The harsh truth is that almost 8 in 10 software projects (or 78%) grow much bigger than planned, often leading to failure. This happens due to poor initial planning, lack of clear communication between teams, and misalignment between stakeholder expectations and user needs.
But before you panic, take a deep breath. This article isn’t just about pointing out the problem — it’s about arming you with the tools to fix it. Drawing from our UI/UX design team’s years of experience, I’ll guide you through the world of information architecture. By the end, you’ll know exactly how to design a clear IA UI in four practical steps, with real-life examples to ground your understanding.
What is information architecture
Information architecture (IA) definition refers to how information (content and functionality) is organized, structured, and presented in a product or application. When done right, it’s like having a master blueprint for your digital space. IA helps you:
- Plan your work on product’s design or on integrating new features seamlessly.
IA helps you visualize the entire product structure before diving into designing screens themselves. This foresight allows you to spot potential conflicts or redundancies early, understand which design elements would fit better in this or that situation, and roughly estimate how much time will be needed for your work. It all saves time and resources during development.
- Gain a clear understanding of your existing product structure.
Having a high overview of the entire product acts as a diagnostic tool. It reveals hidden complexities, redundant features, or underutilized sections that might be dragging down user experience.
- Decide how best to organize content and create navigation.
IA forces you to think from the user’s perspective, helping you group related information logically. This results in intuitive navigation that guides users naturally through your product, reducing friction and improving overall experience.
- Ensure all team members and stakeholders are aligned and moving in the same direction.
A well-defined IA serves as a shared vision for the product. It helps prevent miscommunication between designers, developers, and stakeholders, ensuring everyone understands the product’s structure and goals. With a clear plan on hands, it becomes much easier to explain some new ideas for different departments.
- Schematically displays the difference between various elements of the application.
IA visually represents the relationships between different parts of your product. This clear differentiation helps in prioritizing features and understanding how changes in one area might impact others.
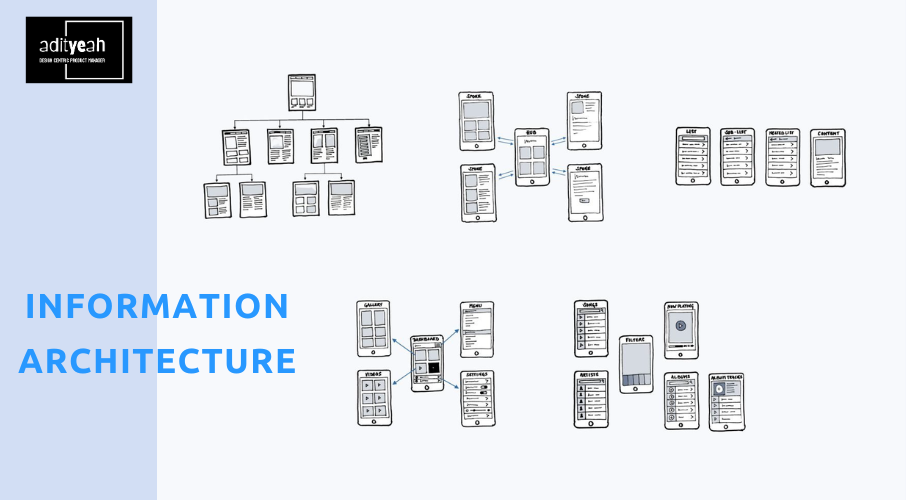
The problem with designing an effective information architecture is that many resources on the internet are either too theoretical without practical guidance, or too basic, only showing sitemaps UX without explaining their real-world use. The approach I’m going to present to you will combine both theoretically easy-to-understand information and practical application of it.
So, now that you understand the information architecture meaning, what should be your starting point for building it?
Step 1: OOUX
Information architecture is based on the principles of Object-Oriented UX (OOUX). It’s a method of designing digital products by focusing on the core objects or “things” that users interact with, rather than just the actions they perform.
What does this mean? Let’s take a project management app as an example.
Theoretical info
- If you were thinking out the structure of your future app using the traditional approach, you might start by listing actions like “track time,” “send invoice”, “manage clients”, and so on. This can lead to a fragmented user experience with separate sections for each action.
- With the OOUX approach, you’d start by identifying core objects: Projects, Clients, Tasks, Invoices, and only then think what properties these objects have and what actions they can perform.
Focusing on objects first in OOUX brings more benefits because:
1. It mirrors how users naturally think about and interact with the world. Freelancers think, “I’m working on a project for a client,” not “I’m performing a series of administrative actions.”
2. It creates a more stable foundation for your product that can easily adapt to new features or changes. If you later want to add “expense tracking” or “contract management,” these fit naturally under the “Project” or “Client” objects without major restructuring.
3. It helps prevent feature bloat by keeping the focus on core elements. All project-related information (tasks, time tracked, invoices, etc.) stays together, creating a more intuitive and integrated user journey.
Planning your app using the OOUX approach may take different forms, like a table made in a spreadsheet, or a bunch of sticky notes.
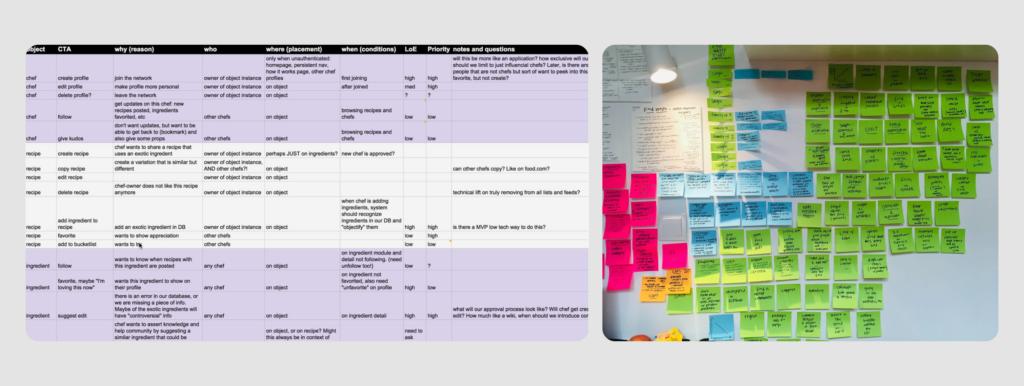
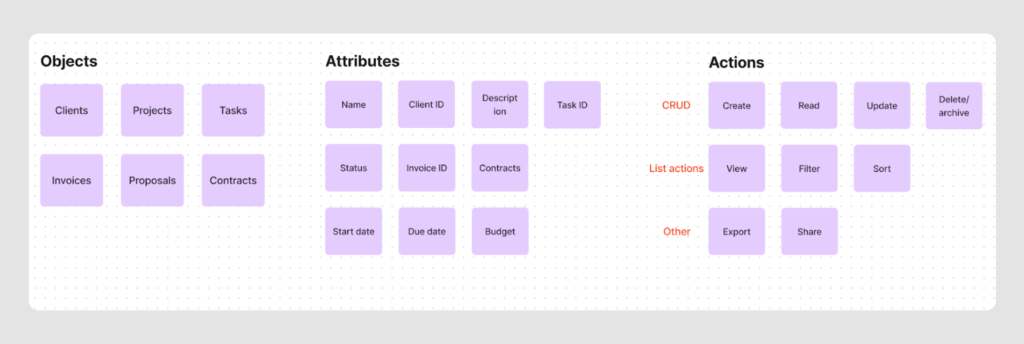
No matter how it looks, with OOUX you divide your entire interface into
- Objects – the main “things” users interact with in your digital product. Think of them as nouns. For a project management app, these gonna be projects, tasks, clients, and so on.
- Attributes – characteristics or properties that describe an object. For a project object, attributes might include name, client, description, and status.
- Actions, sometimes also referred to as call to action (CTA) – define what users can do with the objects. They’re like verbs – for a project object, actions could include “create,” “delete,” “view”, and “edit”.
Object-oriented design can get complex, especially when defining actions for different roles in an app. For example, in an app like Uber, you’d need to figure out actions for passengers, drivers, support staff, the system itself, and admins.
However, when designing information architecture, you don’t need to be that detailed. Instead, you can focus on the admin role, as admins usually have access to all actions. This approach helps you form the overall structure of your application more easily.
Practical use
To begin the IA design process, at this step, you should do three things:
- Define main objects and their relationships (establish how these objects connect to each other),
- Determine object attributes (list the essential characteristics for each object)
- Outline user actions (specify what users can do with each object).
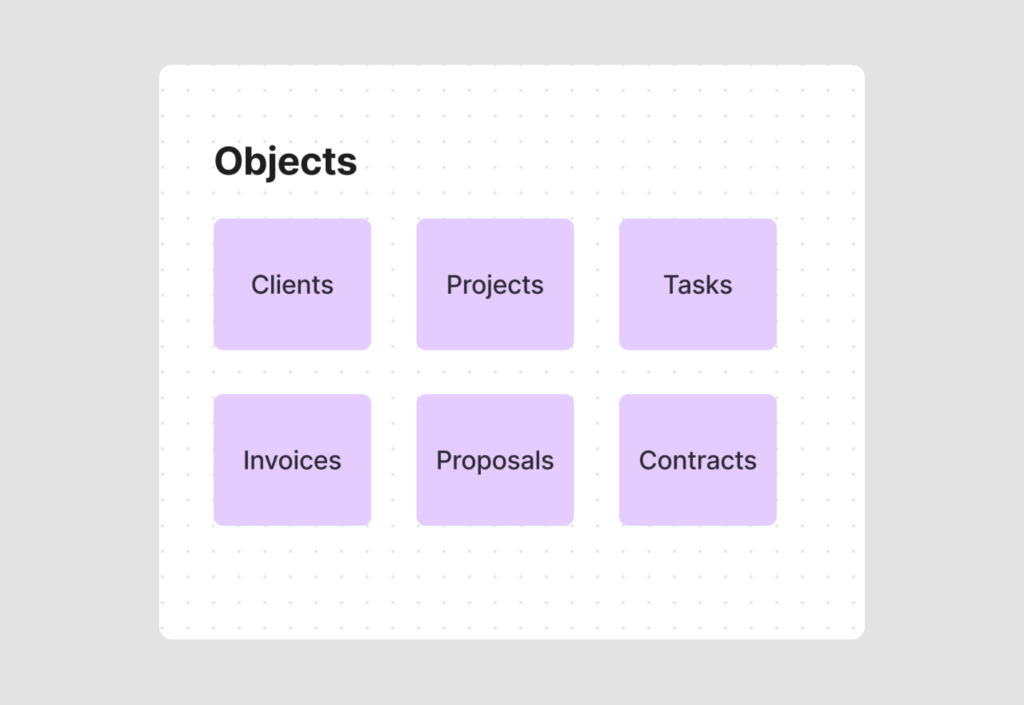
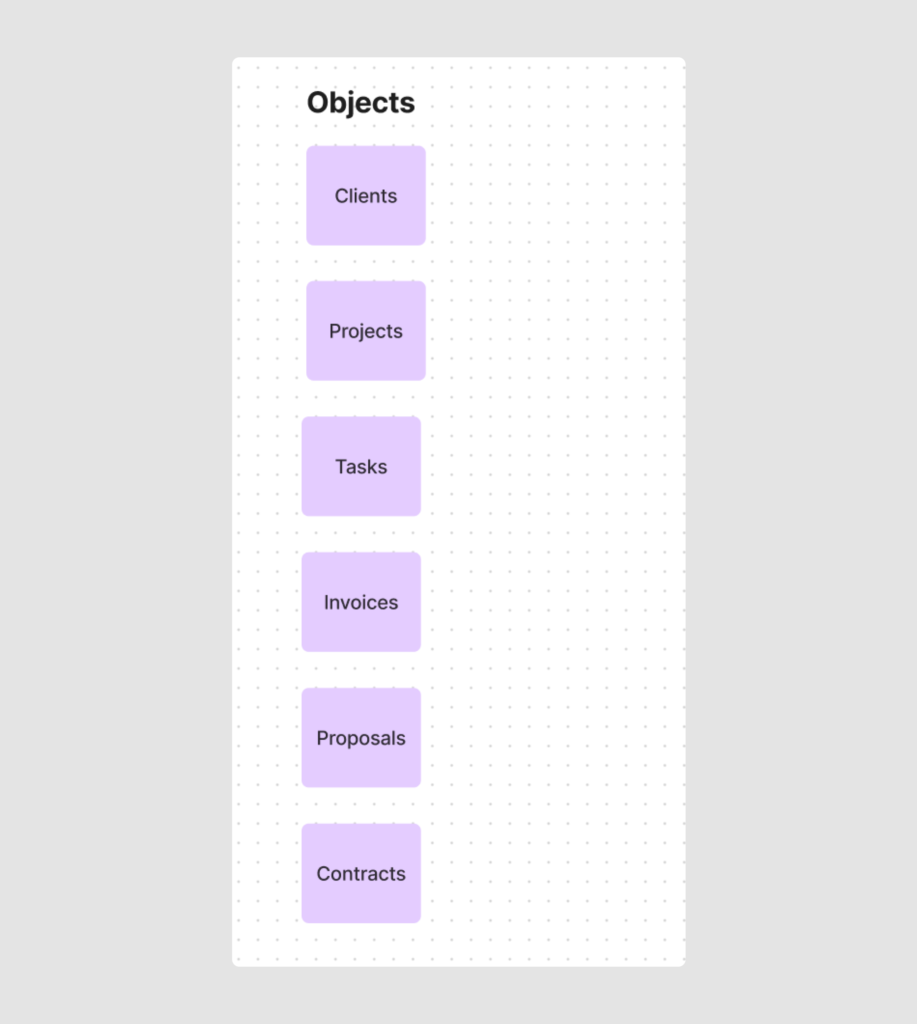
So, we get back to our project management app for freelancers. To identify key elements, ask yourself “What does a freelancer need to work with?” Typically, a freelancer needs:
- Clients
- Projects
- Tasks
- Invoices
- Proposals
- Contracts
These form the core elements of our app’s structure, which often become the main pages or sections of our product. Let’s write them down (I used Figjam for this purpose, but you can use any other convenient tool, such as Figma, Lucidchart, or Miro).
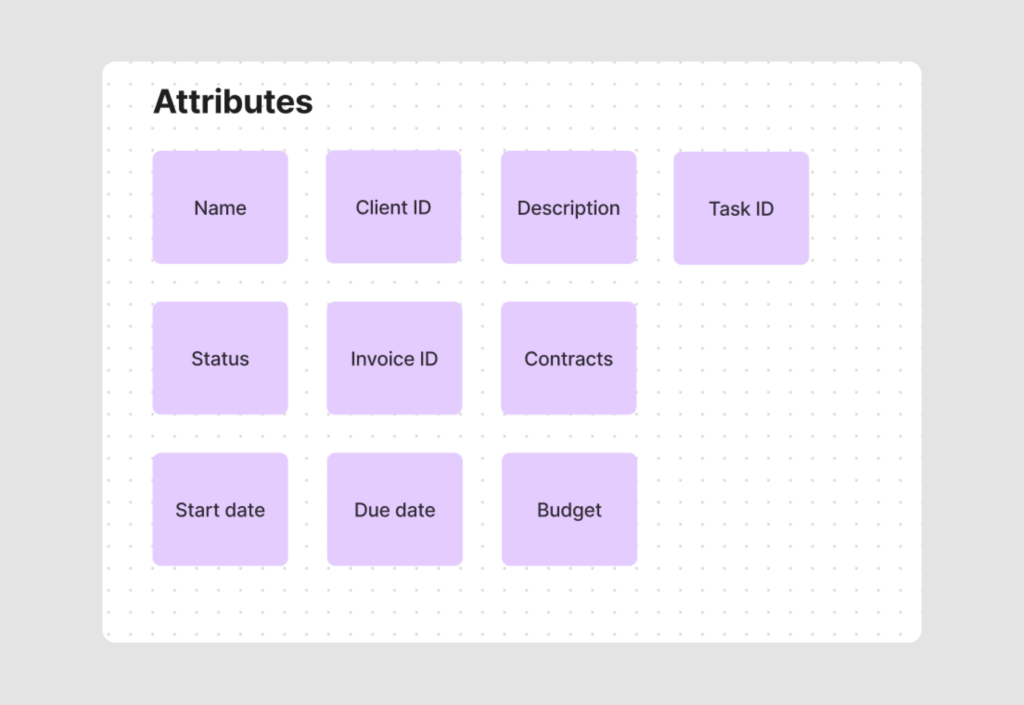
Next, consider each object’s attributes (properties). For example, a Project object might have:
- Name
- Status (In Progress, Completed, On Hold)
- Description
- Client ID
- Budget
- Start Date
- Due Date
- Invoice ID
While objects typically become main pages, attributes represent the information displayed on each page.
Finally, list the actions a freelancer can perform on a Project. To make sure you cover everything, it’s helpful to organize them into three groups:
- CRUD (Create, Read, Update, Delete/Archive).
These are the basic things you can do with most stuff in the app. Like making a new project, looking at project details, changing project info, or getting rid of a project. For important data, such as financial apps, we often put archive instead of delete.
- List Actions (view all, sort, filter).
These are for when you have lots of one thing, like many projects or clients. This includes seeing all items, filtering them, or putting them in order. For example, looking at all your clients or sorting tasks by when they’re due.
- Other cool stuff.
These are special actions that don’t fit in the other groups Some examples are share and export.

By the end of this step, you’ll have three lists:
- Key objects
- Attributes for each object
- Actions users can perform on objects
For your convenience, differentiate these three groups with colors.
Step 2: user stories
In this step, we’ll connect our objects, attributes, and actions together to build the app’s logical structure. To do this, we’ll need to form user stories.
Theoretical info
If objects, attributes, and actions are building blocks than user stories is what we build from them. And here’s a more formal way to explain the term:
User stories are short, simple descriptions of a feature told from the perspective of the person who wants the new capability, usually a user or customer of the system. They typically follow a simple template:
As a [type of user], I want [an action] so that [a benefit/a value].
For example, a user story like “As a freelancer, I want to quickly access my current projects so that I can update their status” might inform the decision to place a “Current Projects” section prominently in the IA.
This way, by creating user stories, we will be able to
- Keep the focus on user needs and goals, ensuring the IA serves actual user requirements.
- Prioritize features and content, which informs the hierarchy and structure of our IA.
- Ensure clear, concise descriptions of functionality, which can guide how information is organized and presented.
Now, let’s see how creating user stories works in practice.
Practical use
In the first step, we made a list of the main components of our app’s structure. In the second step, it’s time to combine them together and start building the IA scheme.
To keep it simple, think of writing user stories as defining the main functions for the admin role, who has access to all actions.
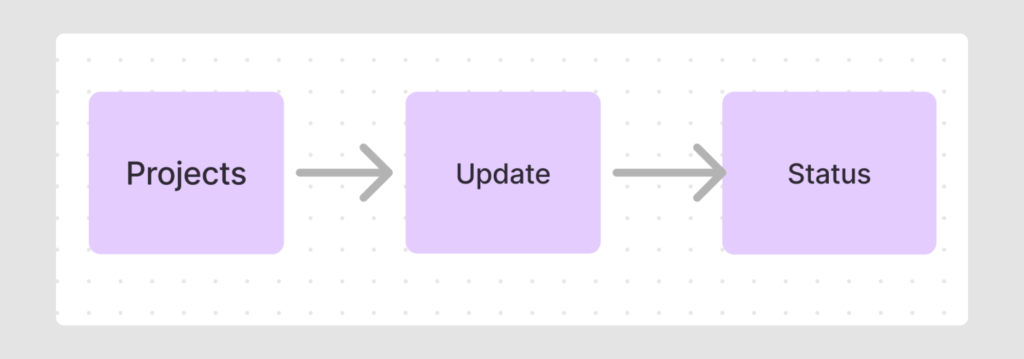
So, if we get back to our example of a user story “As a freelancer, I want to quickly access my projects so that I can update their status”, we can single out
- Object “Projects”
- Action “Update”
- Attribute “Status”
Linking them together would result in something like this:
Here are several more examples of user stories you could come up with for a project management app.
- As a freelancer, I want to create a new project so that I can organize my work for a client.
- As a freelancer, I want to set a project deadline so that I can manage my time effectively.
- As a freelancer, I want to add tasks so that I can break down my work into manageable steps.
- As a freelancer, I want to generate an invoice from a project so that I can bill my clients easily.
- As a freelancer, I want to attach files to a project so that I can keep all related documents in one place.
Still, writing user stories for every case can be time-consuming. Instead, try this simpler approach:
- Line up key objects and think of them as the main pages your future app will have.
- Based on actions, think out main app functions and match them to each object
Start by looking at each object, like Projects, Clients, or Tasks. For each one, think about what users can do with it. Remember the three types of actions we talked about earlier: basic stuff like creating and deleting, list actions like viewing all and sorting, and special features like sharing data.
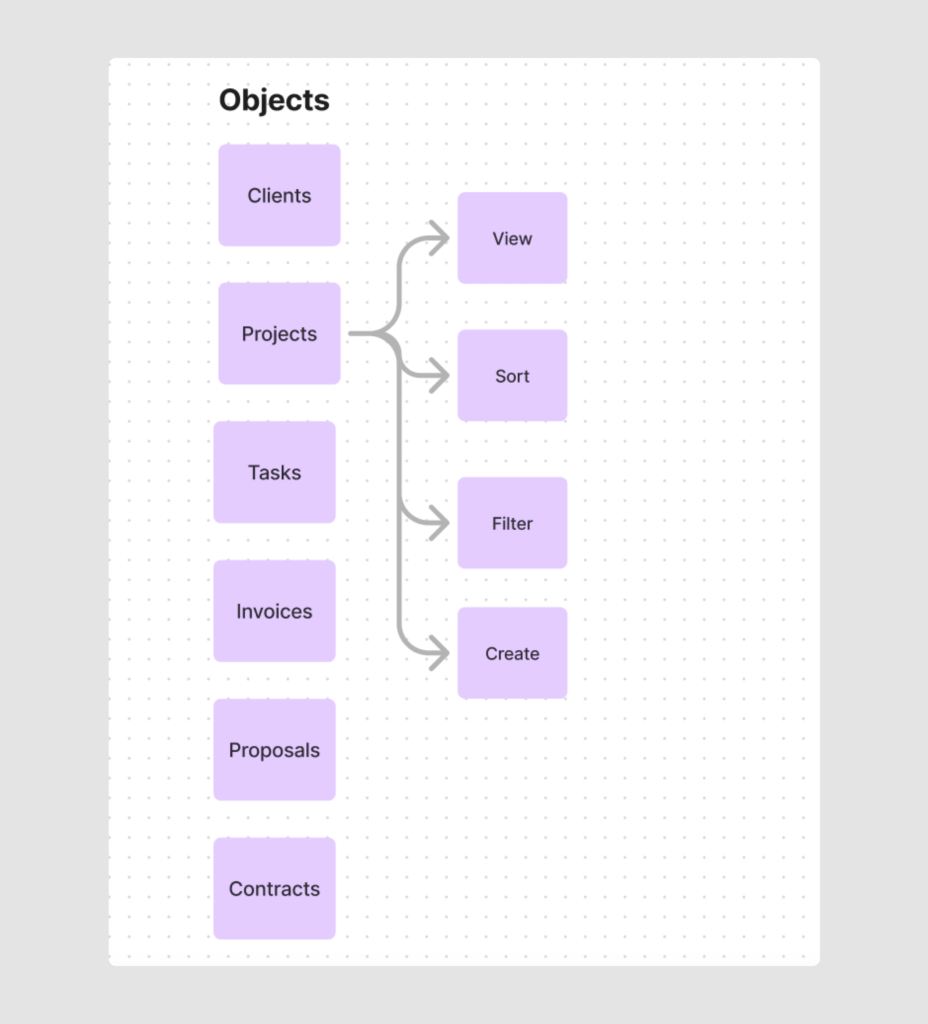
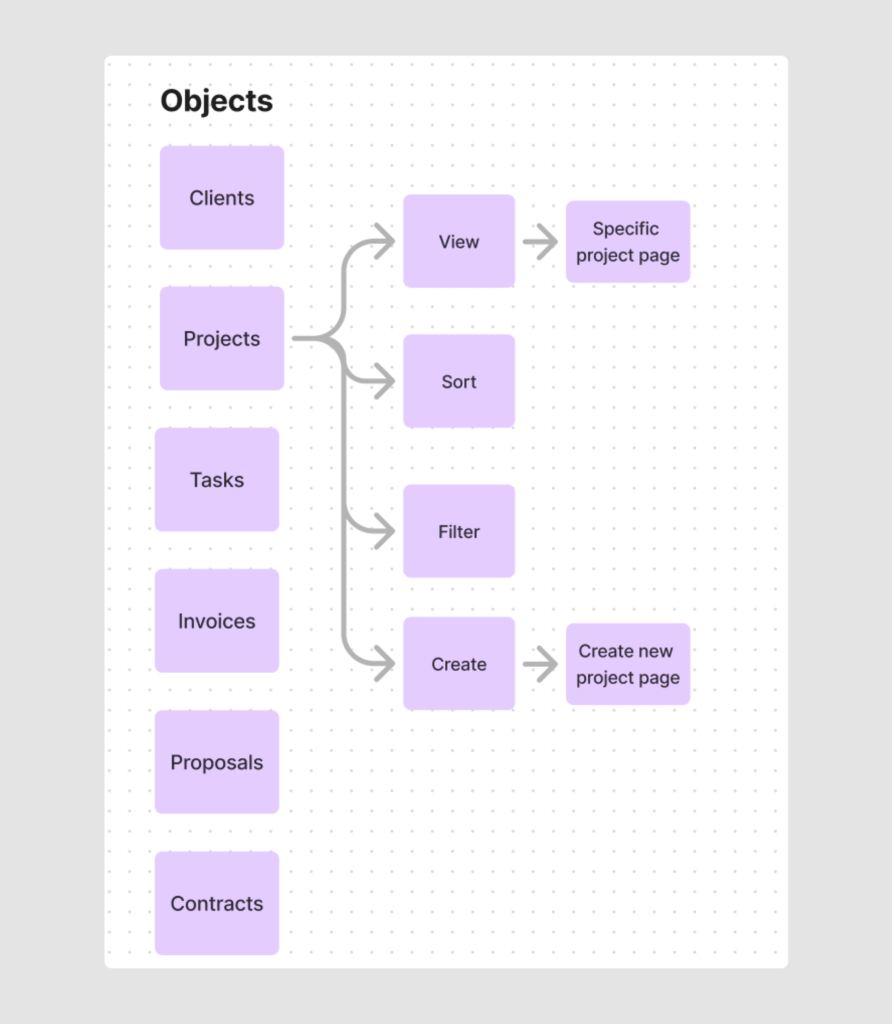
For example, since we’ll have multiple projects, apart from the obvious function “Create new project”, we should apply List actions to the Project object:
- View all projects
- Sort projects
- Filter projects

Going through this process for each object helps you see clearly what every part of your app needs to do. It’s a simple way to make sure you’re not missing any important functions.
- Create user stories for the admin role and group objects, attributes, and actions.
With your objects and actions laid out, creating user stories and building the Information Architecture becomes easier. Present each user story schematically by arranging objects, actions, and attributes in a logical order and establishing appropriate connections between them.
But before I illustrate the complete IA map now, let’s move to Step 3. This step is also part of building user stories but requires detailed discussion, so I wanted to address it separately.
Step 3: modals
Consider this user story:
“As a freelancer, I want to quickly view and edit information about a specific project, so that I can manage all aspects of a project in a focused, detailed environment.”
To provide a positive user experience for this scenario, our project management app should have a separate window or page for each specific project. This needs to be represented in our Information Architecture UX.
This is where modals become useful.
Theoretical info
When we talk about IA in UI/UX design, a modal refers to a specific type of user interface element that temporarily disables the main content, forcing the user to interact with the modal or close it.
In IA, modals can take the form of:
- A new page
- A separate flow screen
- A modal window (pop-up or dialog box)
Using modals in IA allows designers to:
- Focus on the solution without getting attached to specific concepts or structures
- Present information or interactions that don’t fit naturally within the main navigation
- Keep the main IA clean while allowing for necessary additional interactions
This approach helps maintain focus on the overall structure. Still, as I already mentioned, incorporating modals into our IA is a part of our previous step – user stories. Together with objects, attributes, and actions, modals serve as building blocks for user flow.
Practical use
So, let’s get back to where we stopped at the previous step. We have clearly defined key objects and main functionality of the app.
Modals are typically based on actions. Let’s examine each action to determine if it requires a modal:
- “View all projects”: Requires a separate modal for each specific project.
- “Sort” and “Filter” projects: Don’t require new pages or pop-up windows.
- “Create a project”: Needs a new page or a separate window (depending on the amount of information) for users to enter all necessary information.
This analysis allows us to enhance our IA map with appropriate modals.
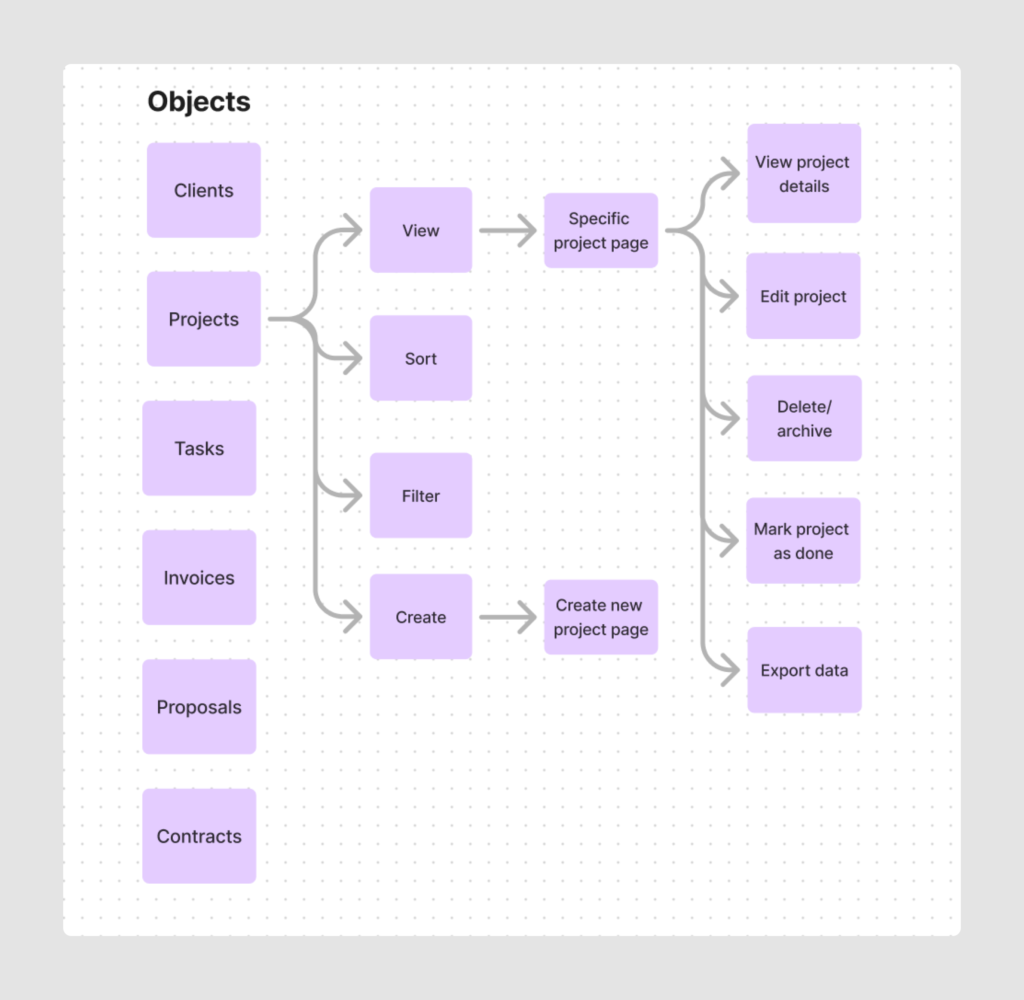
Each modal will have its own set of actions. Referring back to user stories, here are the actions that can be available on a Project page:
- View project details
- Edit project
- Delete/Archive project
- Mark project as done
- Export project
We now link the attributes defined in the OOUX step to modals and their relevant actions. They will represent the content on the modals “Project page” and “Create new project”.
For example:
- Users can view and edit attributes like “Project status,” “Project description,” “Client name,” and “Invoice ID.”
- Actions such as Delete/Archive or Mark as Completed apply to the entire project, not individual attributes.
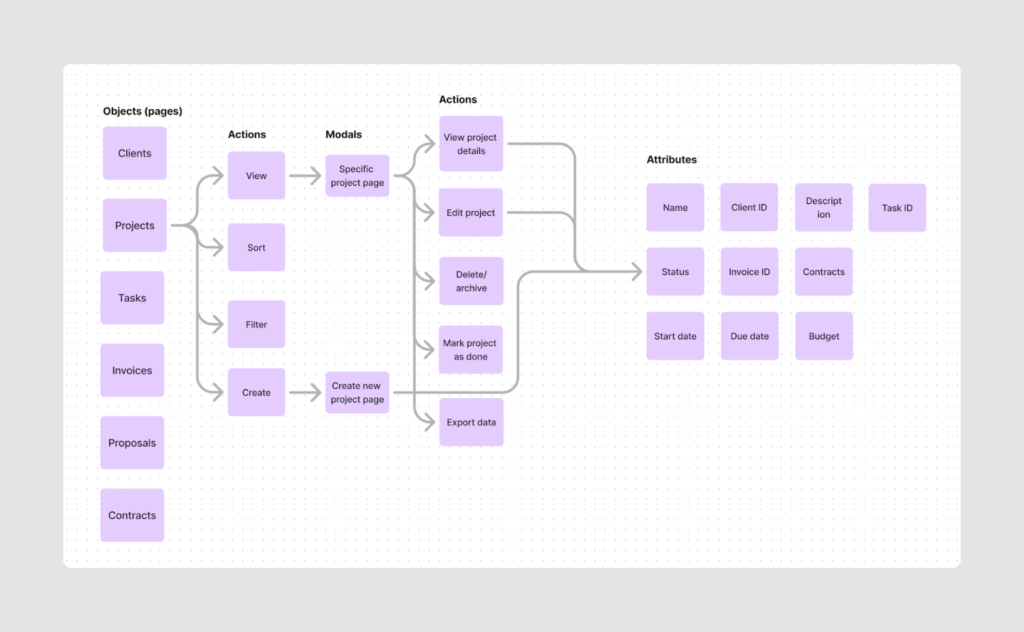
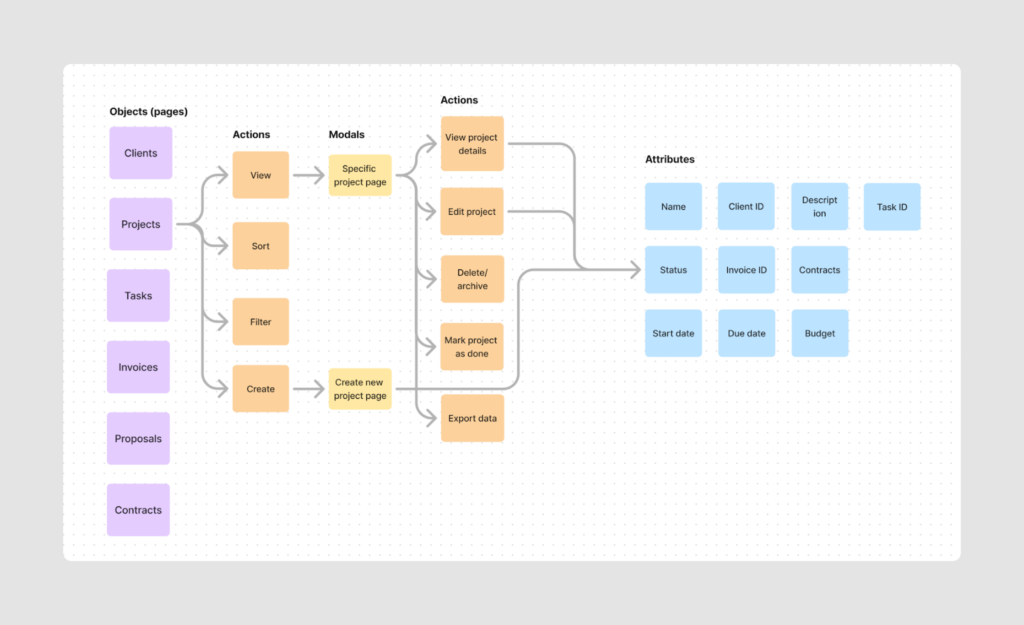
The last thing you have to do at this point is to visually differentiate objects, attributes, actions, and modals in a scheme with different colors.
Step 4: Relationships
Along this text, we mainly focused on the Projects object, detailing its actions, attributes, and modals and formed the structure of this specific flow. However, beyond the connections within each object, we also need to consider how different objects interact with each other. Defining these relationships is crucial for creating smooth app navigation.
Practical use
Our IA map shows that a Project page contains information like Invoice ID, Client ID, and Task ID. This indicates that users can view project-specific tasks, associated clients, and related invoices from a single project page
When we look at the IA map we have so far, we can see that Project page contains information like Invoice ID, Client ID, and Task ID. This indicates that on this page, users can view project-specific tasks, associated clients, and related invoices.
We can define key relationships such as:
- “Creating a Project leads to Adding Tasks, which leads to Generating an Invoice”
- “Clients are linked to Projects, but can exist independently”.
To visualize these relationships, you can use lines or arrows to connect related objects in your IA diagram.
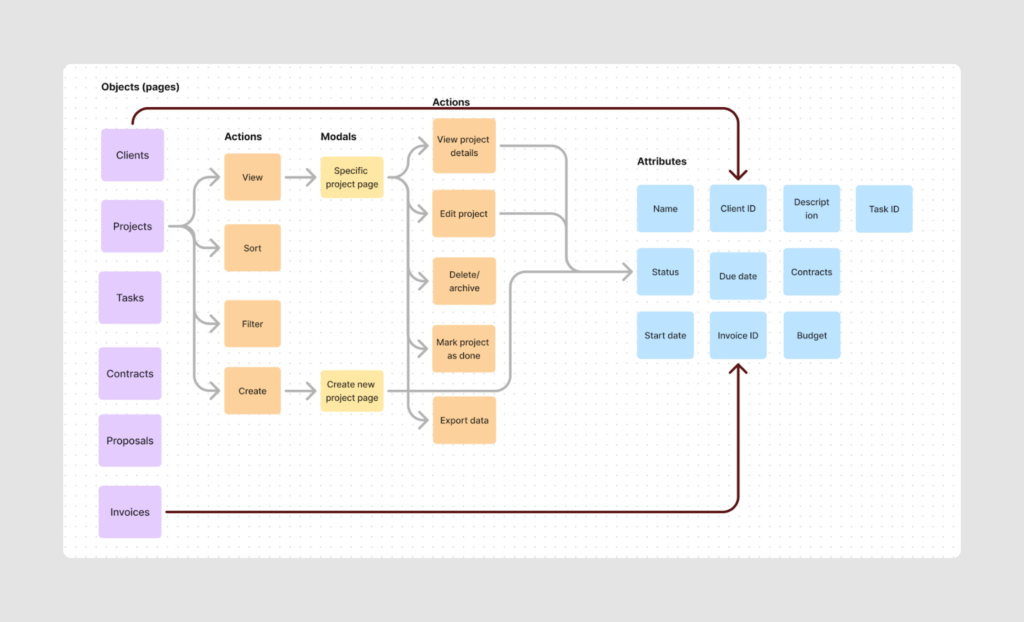
This way, we illustrate how app navigation works. Users can find the Client ID by viewing project details or by going to the Clients page and selecting a specific client. This information is accessible from different pages and is interconnected.
This step completes your IA map, giving a comprehensive view of your app’s structure, functionality, and object relationships. It also allows for non-linear navigation, ensuring your product’s UX adheres to one of the 10 usability heuristics: User Control and Freedom.
Summing up: a quick action plan
Congratulations! We’ve come a long way in creating our IA map covering both theoretical concepts and practical applications. Now, to ensure you clearly understand what you need to do, here’s a concise step-by-step plan to guide you through the process.
- Identify Core Objects with OOUX
- Define main objects: Determine the core elements users will interact with. They are likely to be the main pages of your future app.
- Determine bbject attributes: List key characteristics for each object. For example, a Project might have attributes like Name, Status, Description, Client ID, Budget, Start Date, Due Date, and Invoice ID.
- Outline user actions: Identify actions users can perform on each object. For example, actions for a Project could include Create, Read, Update, Delete/Archive, View all, Sort, Filter, Share, and Export.
- Develop User Stories
- Write user stories: Create short, simple descriptions of features from the user’s perspective. Use the format: “As a [type of user], I want [an action] so that [a benefit/a value].”
- Connect each user story to the relevant object, action, and attribute.
- Incorporate Modals
- Identify actions requiring modals: Determine which actions need a separate modal or page.
- Create modals for complex actions: Define the actions available within each modal.
- Ensure you use different colors for objects, actions, modals, and attributes.
- Define Relationships and Complete IA Map
- Map object relationships: Identify how different objects interact and link together.
- Visualize connections: Use lines or arrows in your IA diagram to show how objects are interconnected.
By building a clear IA at your product discovery stage, you’ll be able to transform the uncertain question of “What are we building?” into the confident assertion “This is exactly what our users need.”
Remember, a well-planned IA isn’t just a blueprint — it’s the backbone of your entire user experience. It can mean the difference between a product that merely functions and one that truly excels in the market.